Virtual Terminal
The Virtual Terminal provides merchants with the ability to execute manual card transactions. This is especially useful in a Mail Order / Telephone Order (MOTO) environment. Virtual Terminal supports Credentials on File framework and is accessible directly from the main menu.
Sample Getting Started with VT window:

Based on your merchant account with Nuvei and your user permissions, you can have access to the following forms:
- Sale - standard sale authorization form.
- Offline Sale - standard sale authorization form added of a offline approval code.
- Pre-Authorization - standard pre-authorization form.
- Pre-Auth Completion - the form to complete an existing pre-authorization.
- Subscription - the form for manual subscription processing.
- Refund - the form to process a refund if you know a transaction's Order ID.
Additionally, after finalizing a transaction, the receipt page is presented and you can also void or refund the transaction at this stage by clicking on the “Refund” or “Void” button in the bottom right corner.
If your Terminal is enabled for Secure Tokens and Subscriptions, you can also Save Card or Create Subscription from the transaction details page. If you select one of these options the SelfCare System is going to create the Secure Token based on the details of the transaction and if you desire to create a subscription, besides creating the Secure Token, you are going to be redirected to the subscription creation page with a few fields already filled.
It is also possible to print the Merchant Copy or Cardholder Copy of the transaction's receipt, if needed and depending on the languages configured on the platform, you can also choose in what language the receipt should be.
Sale
The Virtual Terminal provides merchants with the ability to execute manual payment card transactions. This is especially useful in a Mail Order / Telephone Order (MOTO) environment.
Sample Standard Sale window:
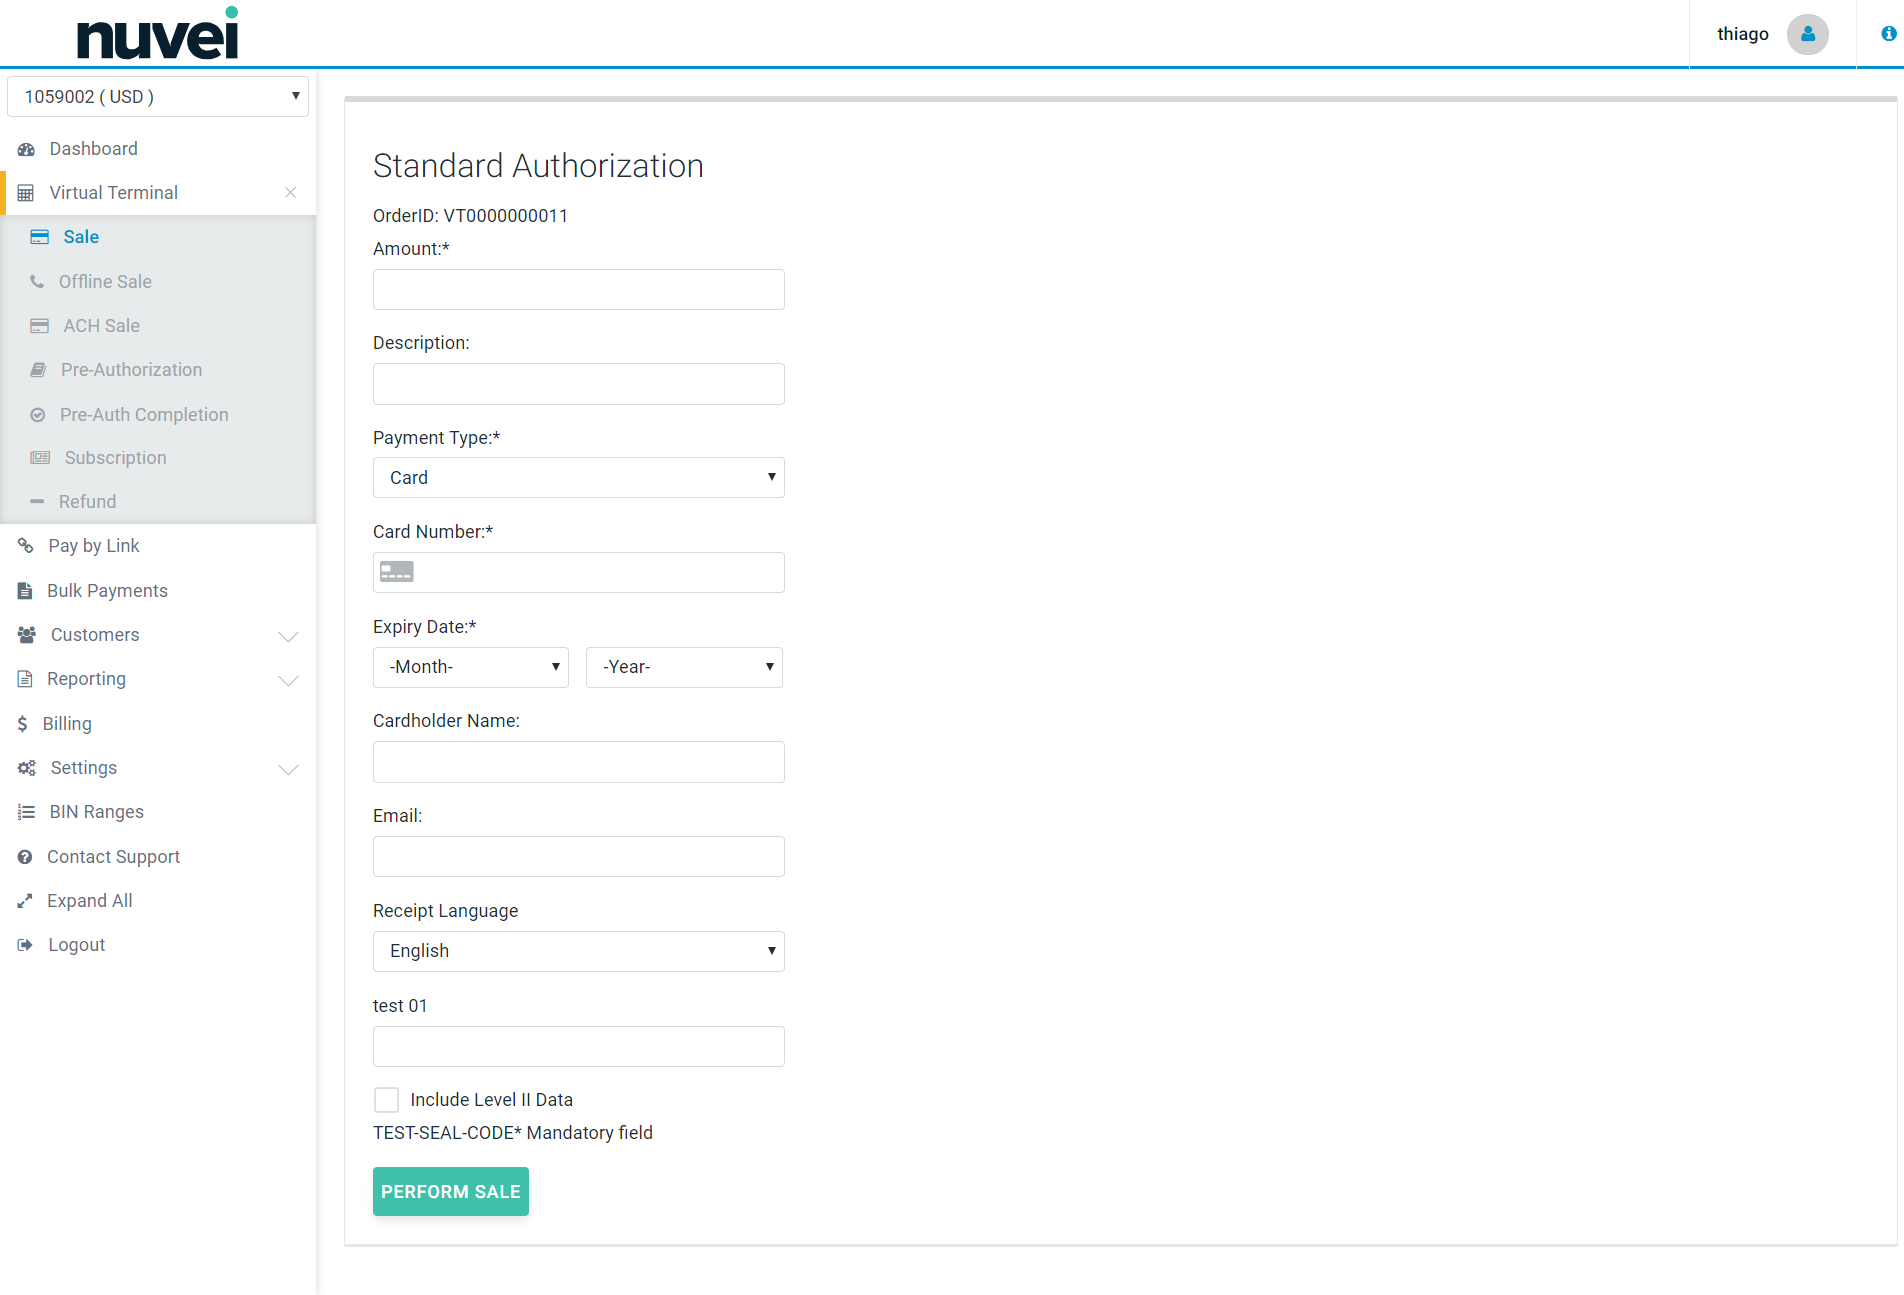
Virtual Terminal screen can have 3 types of fields: required, optional and customized.
- Required Fields can’t be hidden or disabled. They are: Order ID, Amount, Description, Card Type, Card Number, Expiry Date and Cardholder Name. All of these fields should be populated for each transaction.
- Optional Fields for a Virtual Terminal are set on the Terminal setup page (General Setup section, under Setting Menu): Show CVV, Show Issue No., Show AVS.
- Custom Fields are maintained in the Custom Fields section (see Custom Fields).
Clicking the ‘Perform Sale’ button starts the processing of transaction when all required details are entered.
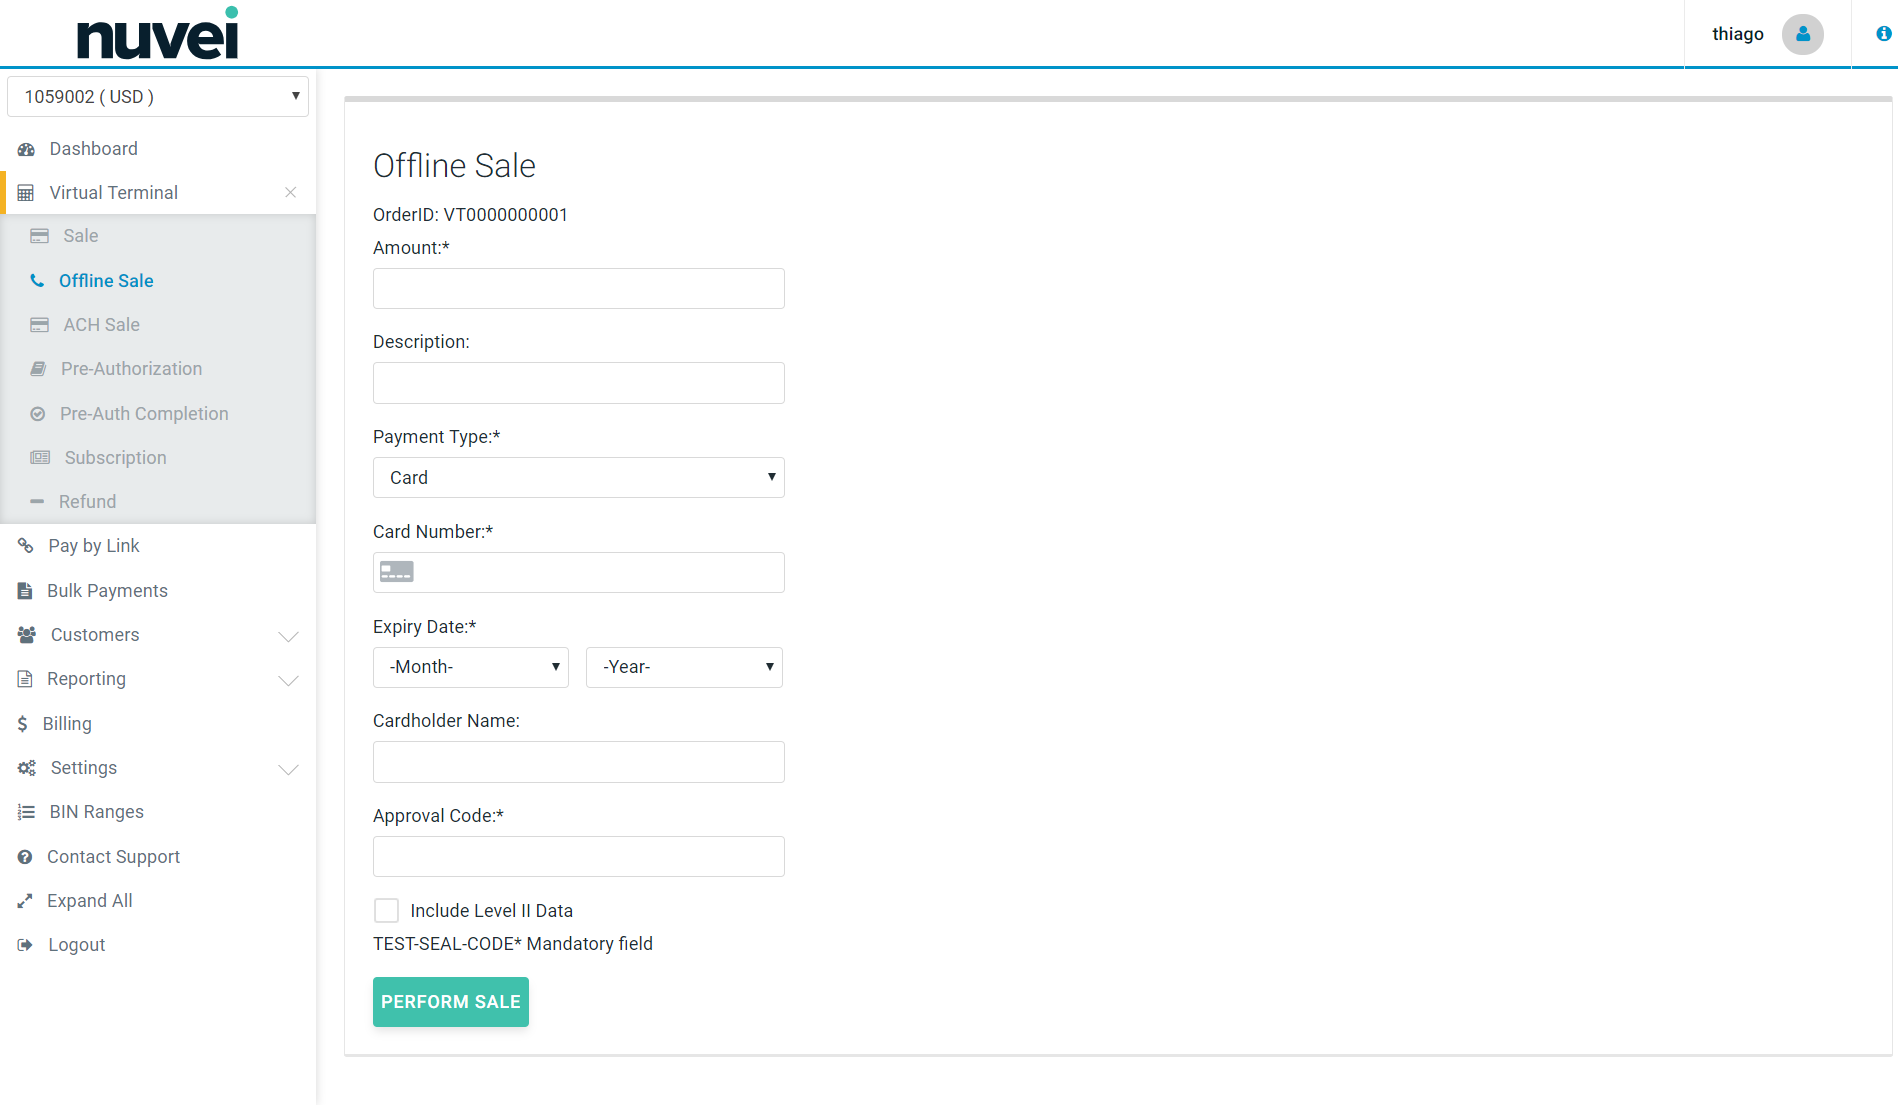
Offline Sale
The Virtual Terminal also provides merchants with the ability to execute manual payment card transactions offline.
For that, the system requires a approval code, which the Merchant needs to request from its Acquirer. This is useful to not stop making sales, even when the Acquirer is having connectivity issues.
Go to Virtual Terminal tab in the SelfCare and choose “OFFLINE SALE”.
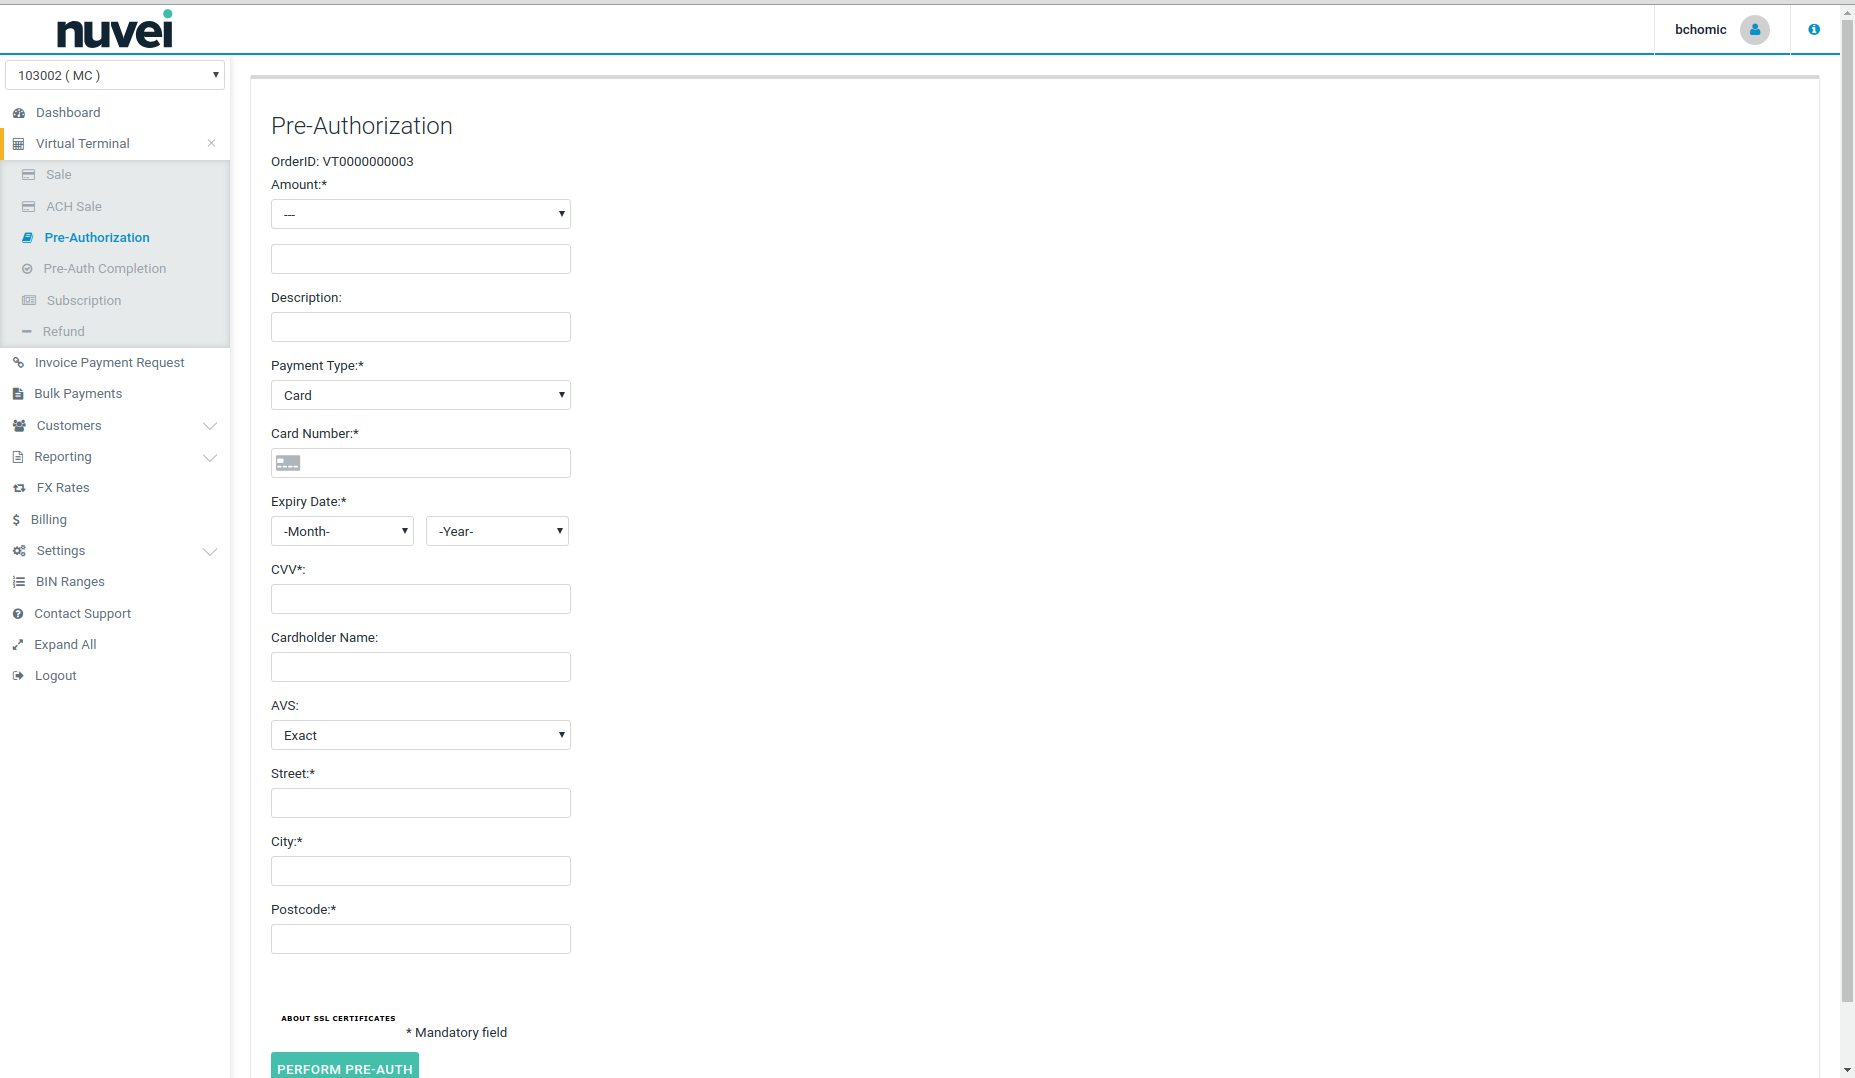
Pre-Authorization
This will bring-up the form with fields identical to the Standard Sale but clicking on the “Perform Pre-Auth” will process the transaction as a pre-authorisation. A successful pre-authorised transaction will have to be completed later.
Sample Pre - Authorization window:
Pre-Auth Completion
The Pre-Auth search form will be displayed and you can search for a transaction by order ID or card details using this form:

Search can be run by Order ID or Card Details. Actual search field(s) will become active when highlighted; search field can be changed by mouse click or using the keyboard for navigation. You should provide the full order ID to be able to search by this field.
In case you do not remember your Order ID or Card Number, any pre-authorised transactions can be found in the Open Batch.
The search result will be displayed just beside or below the search form.
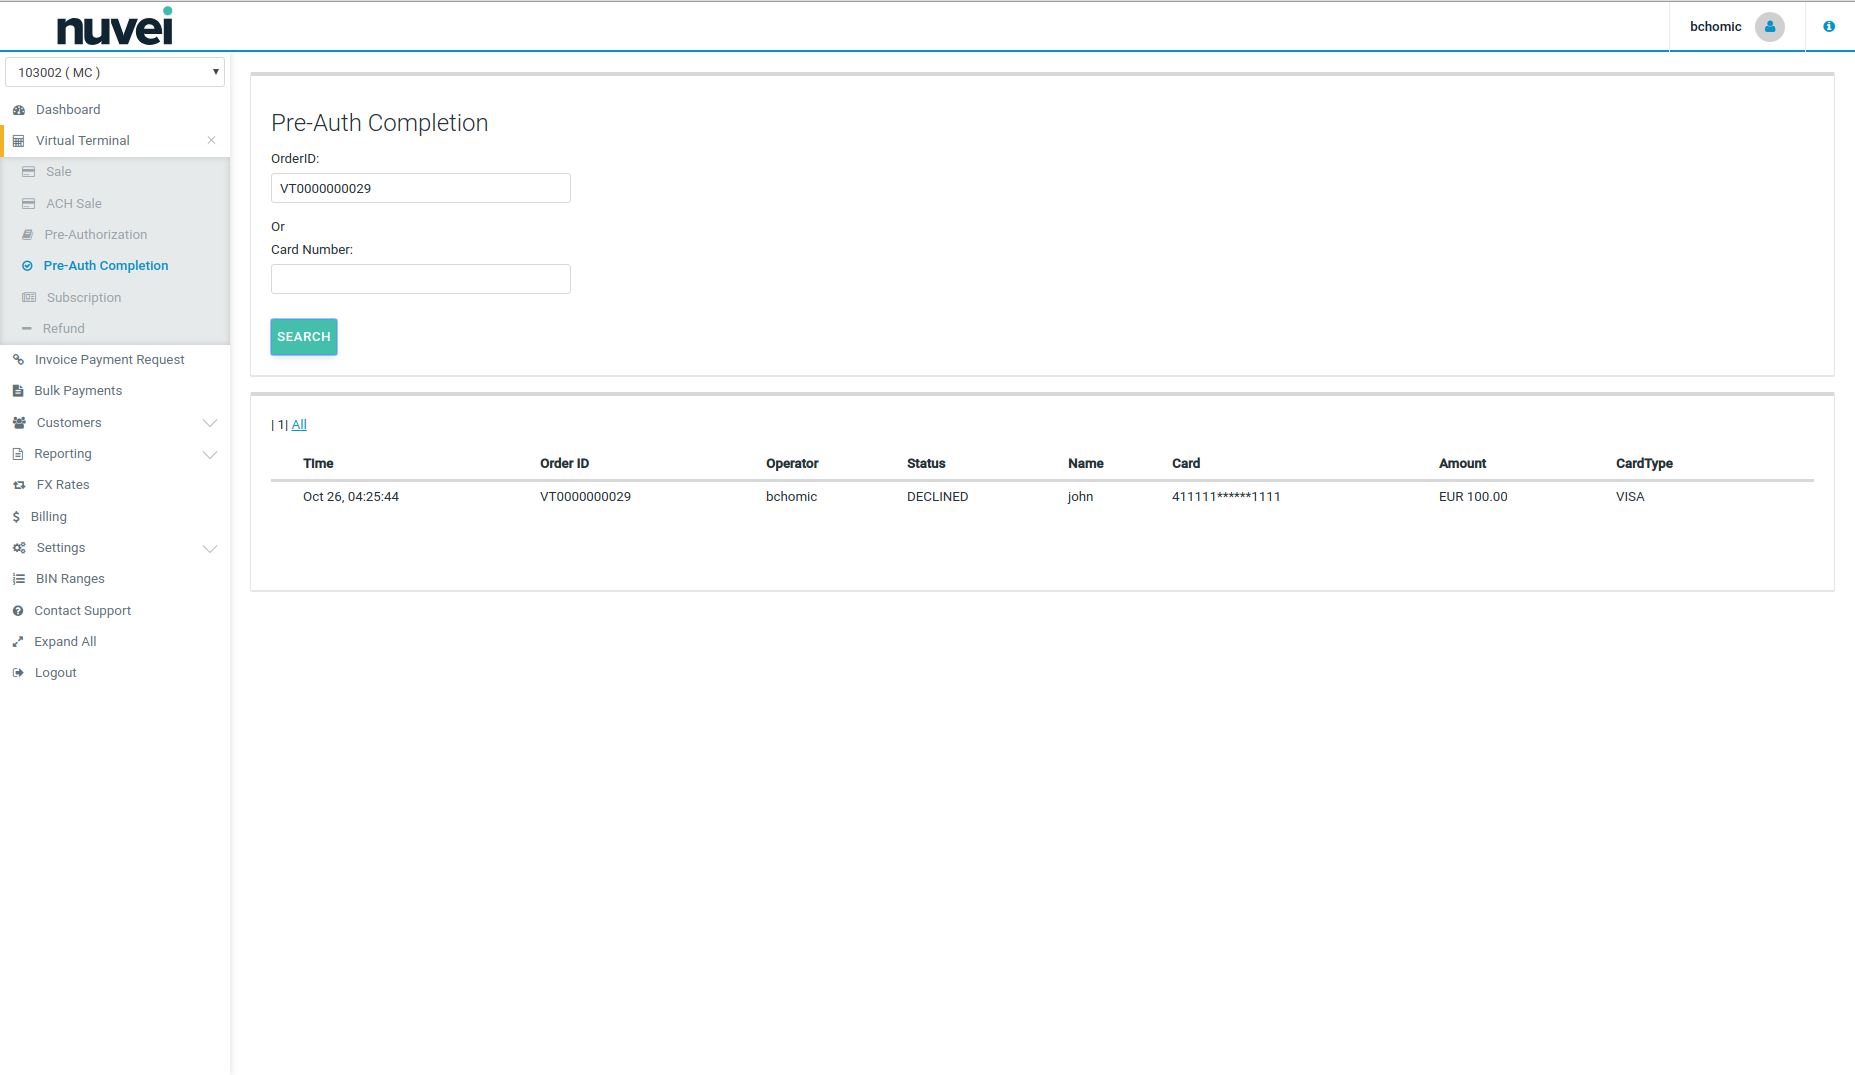
In order to proceed with the transaction completion process, you need to click “Complete” link beside a pre-authorised transaction.
The Pre-Auth Completion page contains the original pre-auth transaction details and has one editable field only (“Amount”), and 3 buttons:
- Continue – this will allow you to proceed with completion.
- Cancel – this will cancel your current activity and bring you to the Pre-Auth Completion search form.
- Void – this will void the pre-authorization transaction and a confirmation box will be displayed.
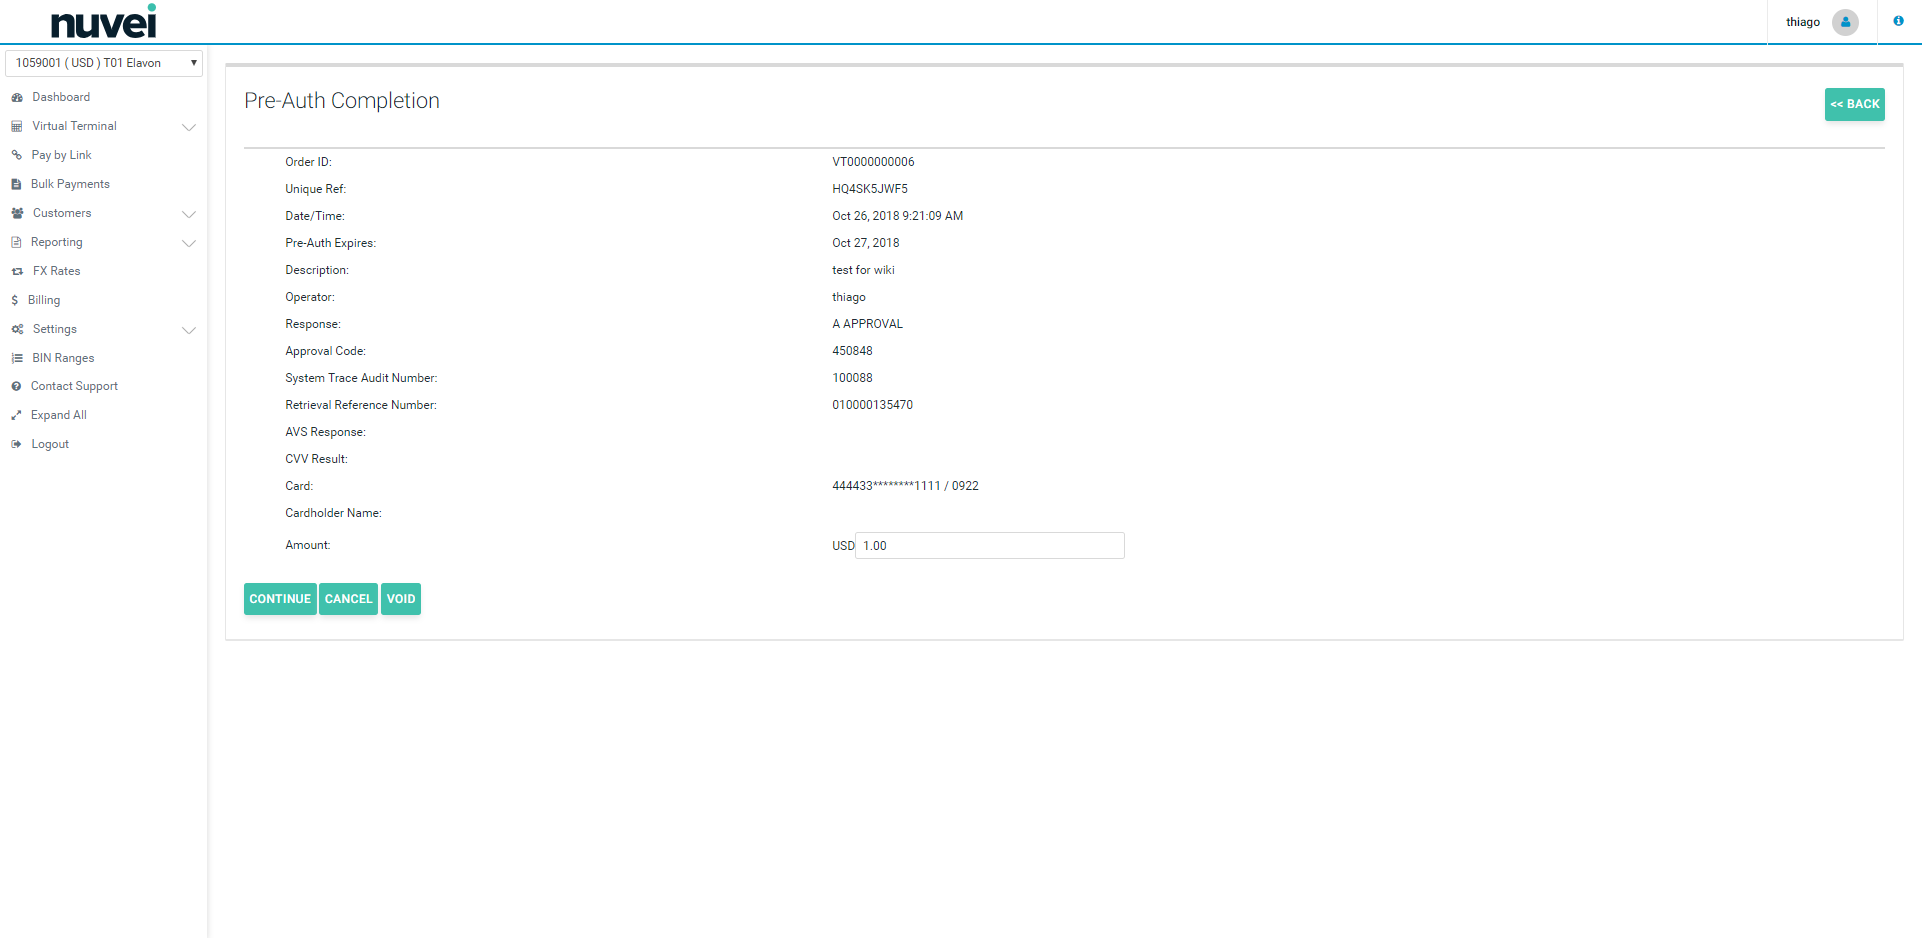
After clicking the “Continue” button, a Pre-Auth Completion form will be displayed.
The “Continue” button disappears after it is clicked on, but 3 other buttons will be displayed instead: “Complete”, “Process As Sale” and “Edit Amount”.
If the amount entered in the previous step is correct, click the “Complete” button to follow to the next step, or click the “Edit Amount” button if you wish to modify it. If you wish to process this is a Sales Transaction click on “Process As Sale” button.
A confirmation dialog window will be displayed when the “Complete” button is clicked.
Depending on the final transaction amount, you can see one of two possible messages in the confirmation box:
- If completion amount is in the 15% margin of an original pre-auth transaction, the message will say: “Are you sure you wish to complete this transaction?”.
- If amount is outside of the 15% margin, the message will read: “This transaction is outside the 15% margin allowed for Pre-Authorisations. A reversal of the original Pre-Authorisation will be performed followed by a standard Authorisation. Are you sure you wish to proceed?”.
Please note that two transactions with the same order ID are displayed in the Open batch list when outside of the 15% range transaction is completed. This list will contain a reversal of the original Pre-Auth transaction and a new Sale transaction with a status assigned by Nuvei depending on the processing result.
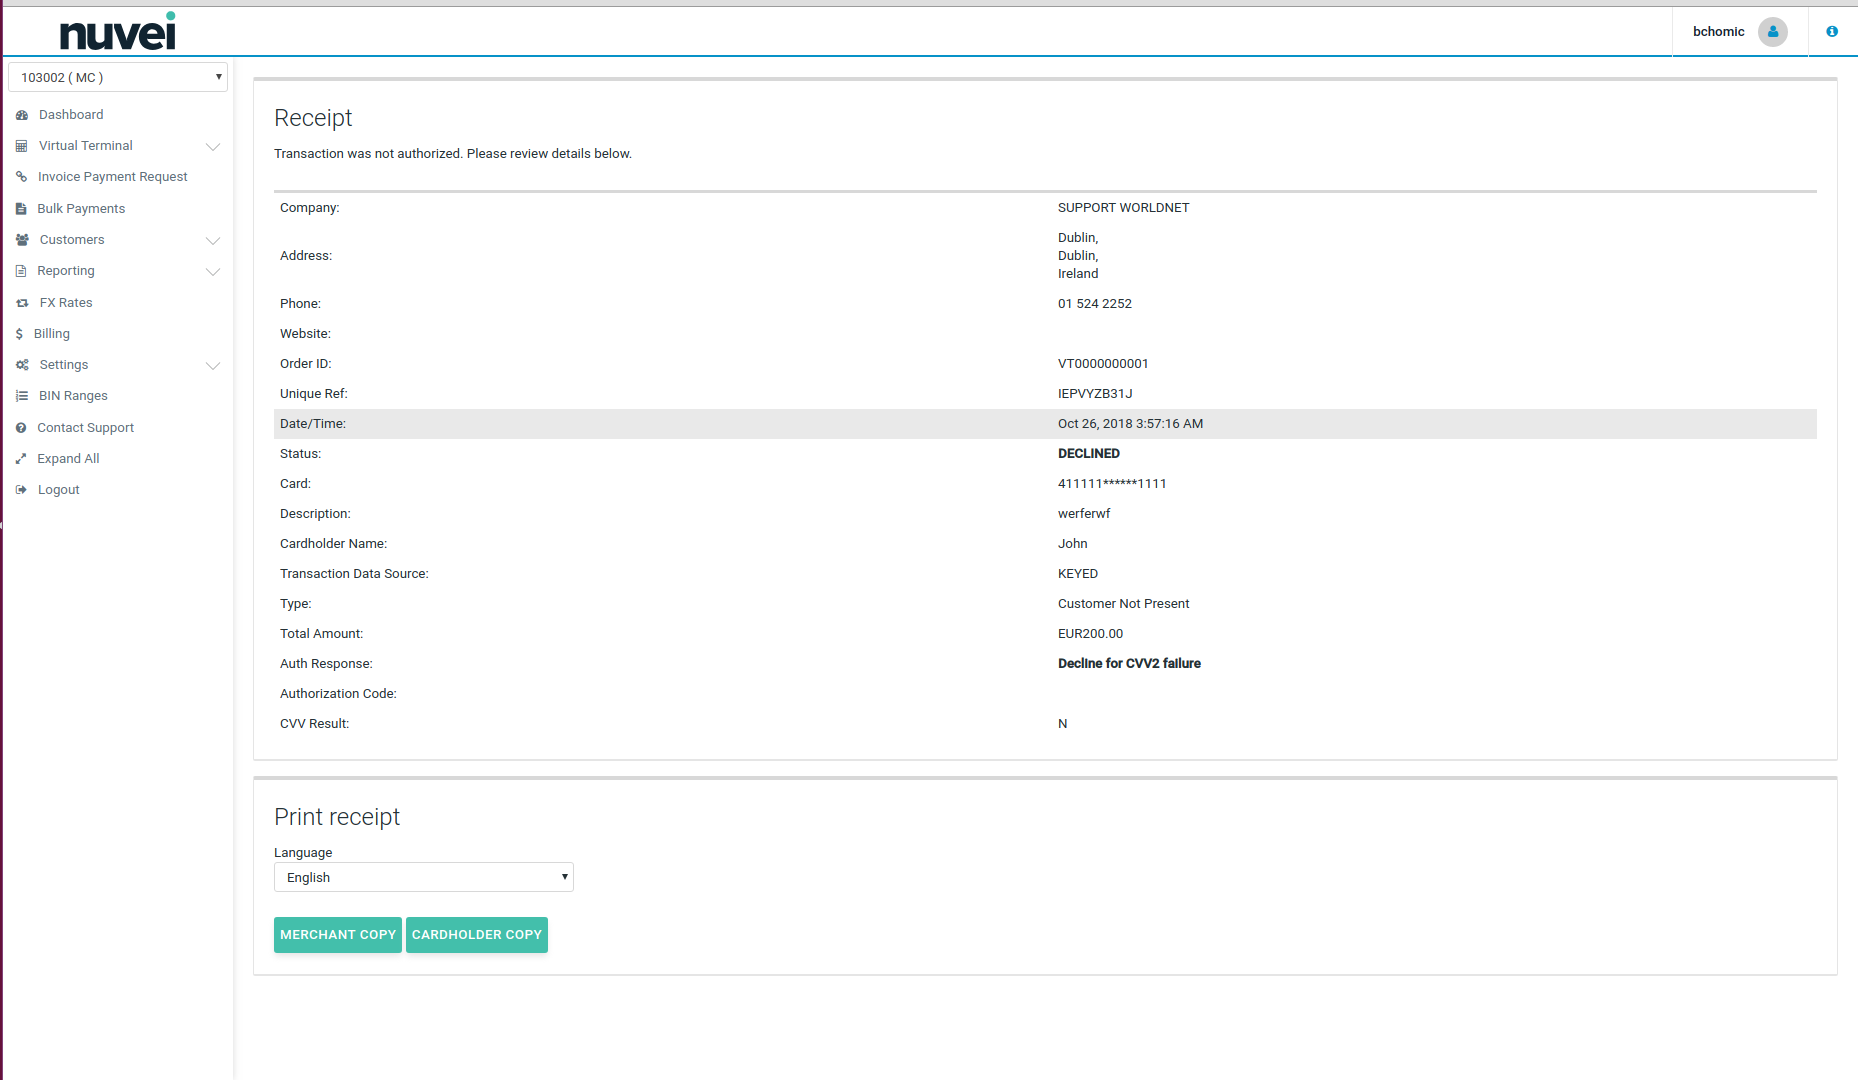
Refund
The “REFUND” option can be found under “VIRTUAL TERMINAL” tab in the SelfCare . This function allows you to process instant Refunds for all Virtual Terminal transactions. A search form will be displayed where you can search for a transaction using Order ID or Unique Ref number. After a transaction has been found, a result window will be displayed:
Sample Refund window:
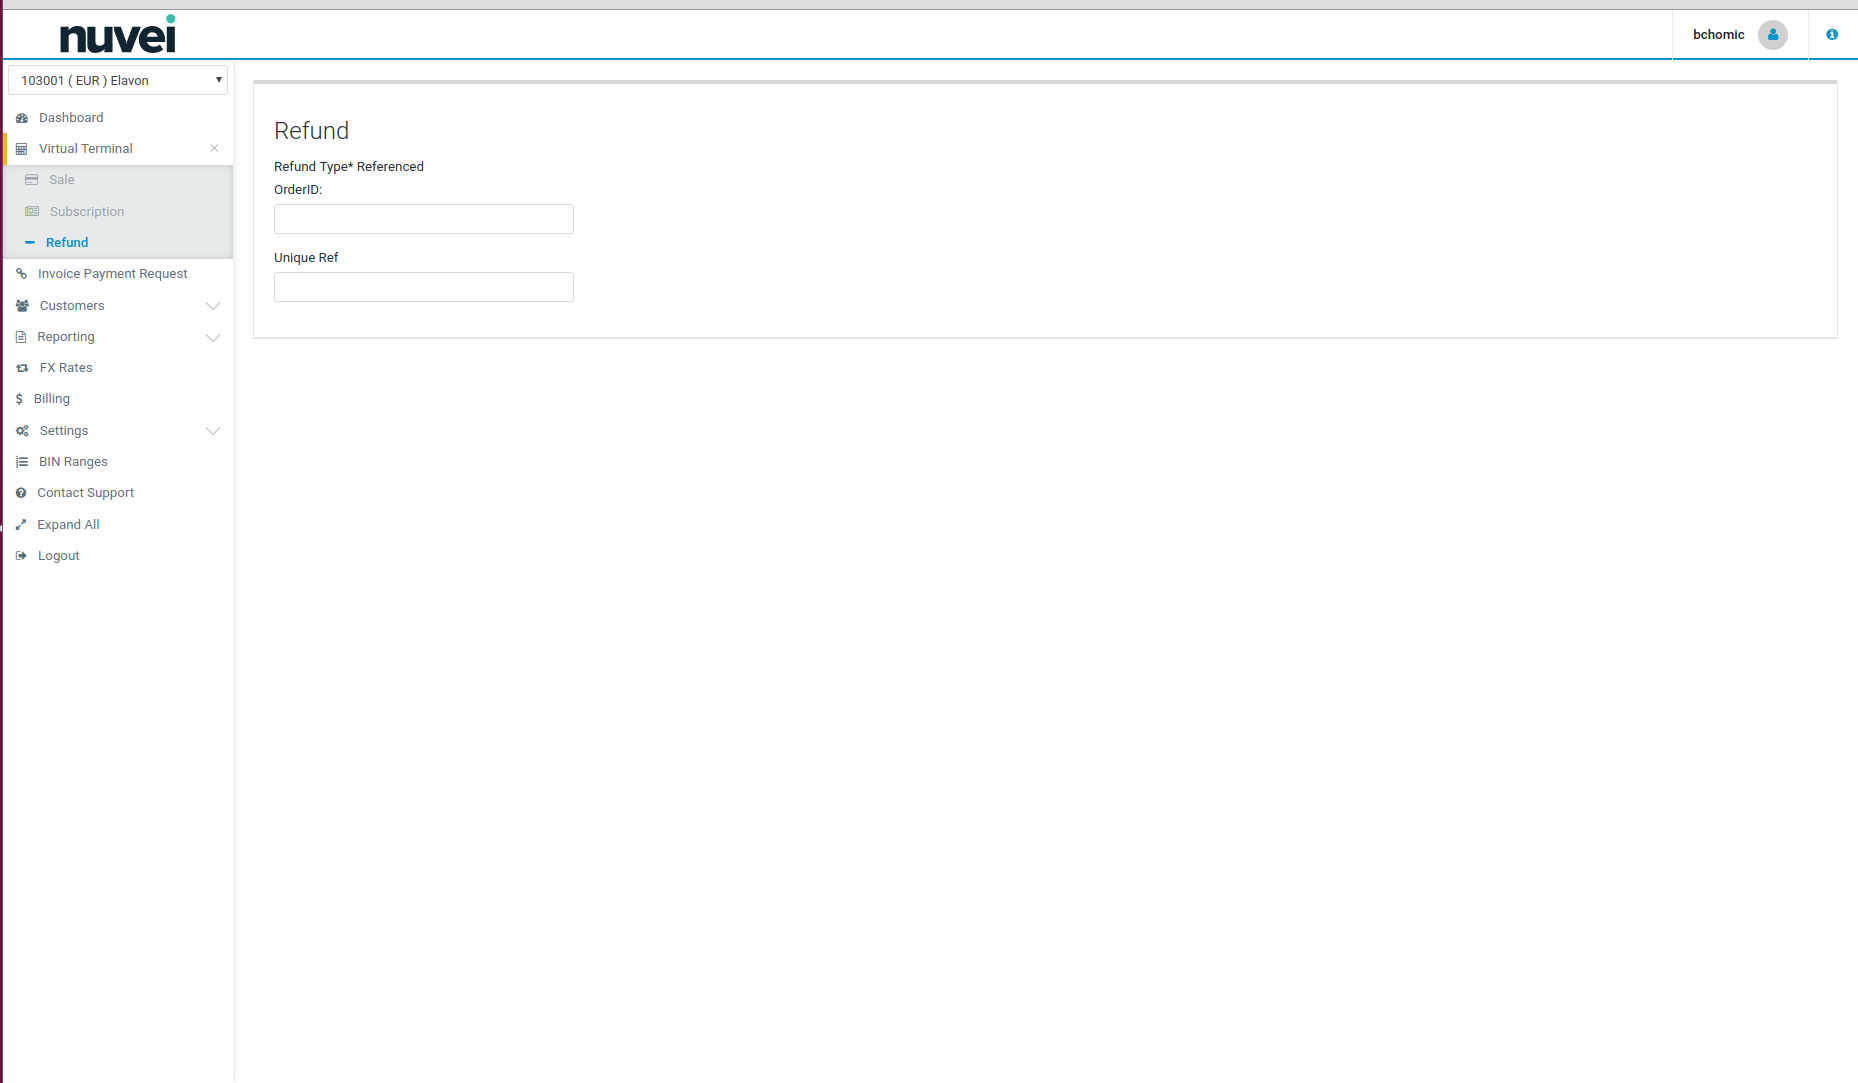
There are 2 modifiable fields:
- Amount - you can set the amount which you wish to refund. You will be allowed to refund up to the original value of the transaction.
- Reason - you can put the reason for the refund for future reference.
Once both boxes are completed, you need to click on “Refund” button. This will display a confirmation window and after accepting it, the refund will be processed.

Enhanced Data
If your terminal is enabled to use Enhanced Data (Level 2 or Level 3), your virtual terminal Sale, Pre-Auth and Offline Sale initial screens will come with an additional action: ADD ENHANCED DATA.
Standard Sale %selfcarevirtualterminal-sale-initial
If you decide not to use this option, you might provide it later on, when the receipt is presented, or even using the Open Batch.
Standard Sale - Add Enhanced Data Before Authorization %selfcarevirtualterminal-sale-addenhanceddata
If you decide not to use this option, you might provide it later on, when the receipt is presented, or even using the Open Batch.
Standard Sale - Receipt %selfcarevirtualterminal-sale-receipt-initial
If you decide not to use this option, you might provide it later on, when the receipt is presented, or even using the Open Batch.
Standard Sale - Receipt - Add Enhanced Data After Authorization %selfcarevirtualterminal-sale-receipt-addenhanceddata
Even if you decide not to use the option above, you can always go the Open Batch and Add the enhanced data before the transaction is settled.
ENHANCED DATA CAN ONLY BE ADDED BEFORE SETTLEMENT
The enhanced data can only be added before the settlement of a transaction. So, if a transaction is moved to the closed batch, you loose your opportunity to try lower fees with your Acquirer. To avoid that, you should consider using a default template for enhanced data with the auto-fill feature.
For more information on the template feature, consult the Enhanced Data Templates section.
ENHANCED DATA AUTOFILL
If your terminal is configured to use the autofill feature with the enhanced data feature, the gateway is always going to try to apply the available default template to the transaction's enhanced data.
For more information on the template feature, consult the Enhanced Data Templates section.
Surcharge Fee
When surcharge is enabled for your terminal and a supported card type is entered, the surcharge amount is displayed at the bottom of the Virtual Terminal. An option to bypass the Surcharge Fee is also available.
