Table of Contents
Subscriptions
Subscriptions are useful for merchants who are required to perform regular and recurring payments. This feature allows merchants to set up automatic payments for a set date, regular intervals, for a specific period of time, without manual intervention, or even manual payments plans, if needed.
The subscription feature is formed by two main elements:
- Stored subscriptions: the stored subscription is a payment plan/ schedule, which works as a model for to created new subscriptions.
- Subscriptions: the subscriptions define a plan for payments (automatic or manually trigged) for a specific customer.
The Subscription and Stored Subscription features are located under the “Customers” tab in the SelfCare system.

Also:
- Every subscription will have a payment plan or schedule of some kind. This will determine how often payment is taken and how much is taken each time.
- The Subscription feature requires the use of Secure Tokens, so remember to register secure tokens before trying to register a subscription.
- To register an actual subscription, a Stored Subscription is necessary.
Stored Subscriptions Registration
In order to be able to set up a subscription, it is necessary to set up a Secure Token and a Stored Subscription first.
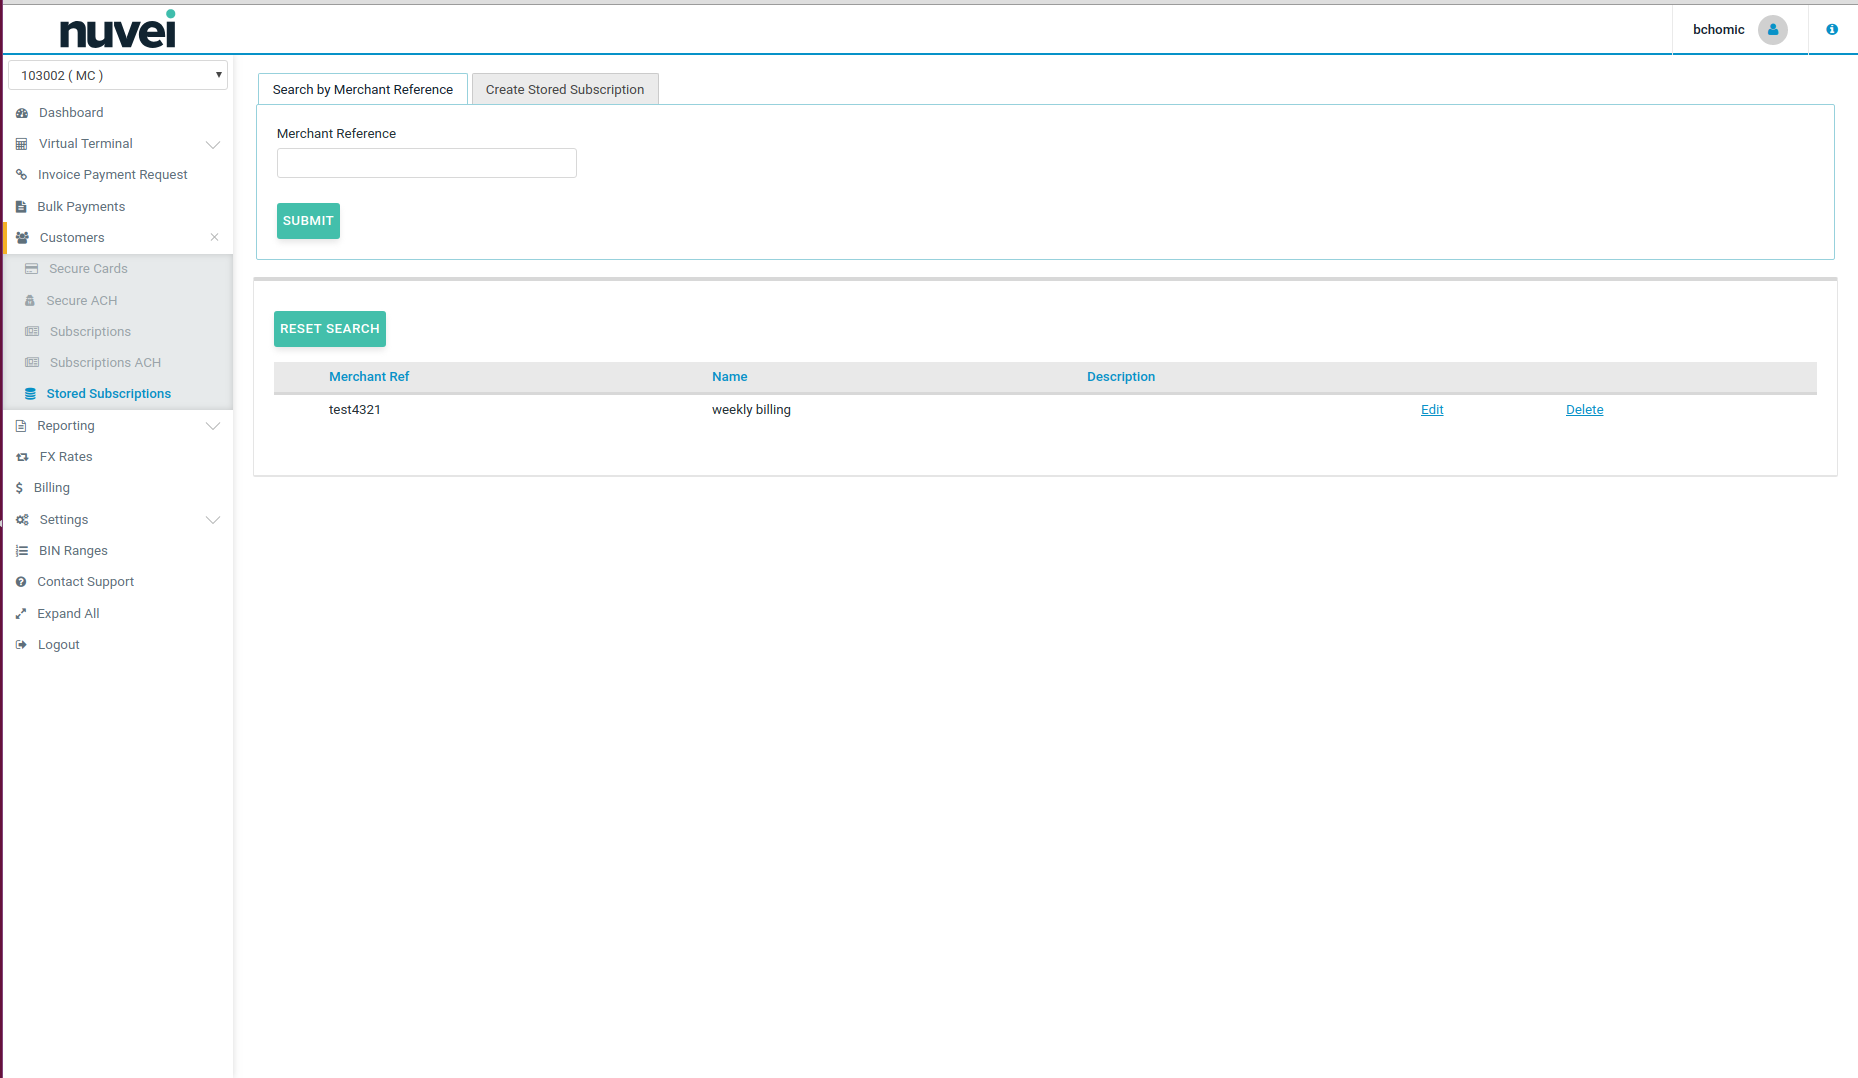
You can search for stored subscriptions by Merchant Reference number.
Before you will be able to create a new subscription, you need to save a subscription template in the Stored Subscriptions section:
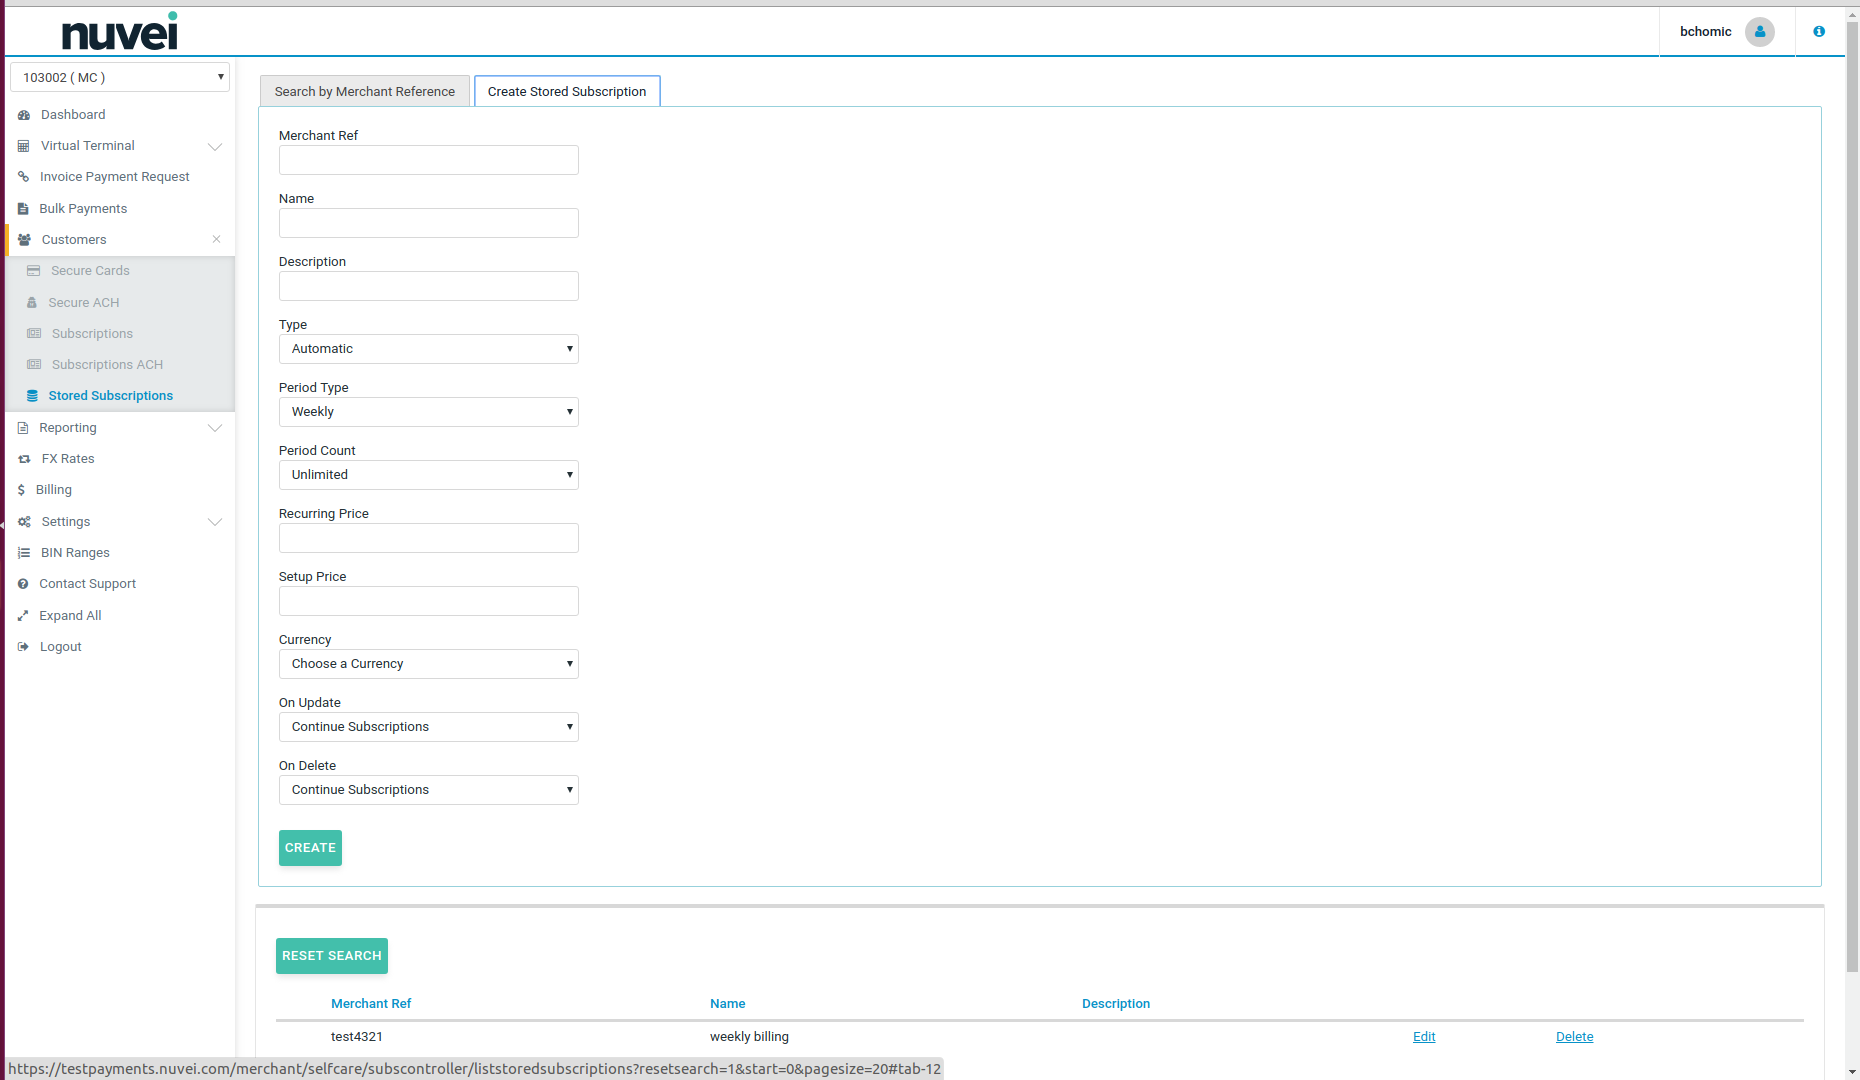
- Go to the “Create Stored Subscription” tab and fill in the details of your subscription template.
- You need to think of a Name for the subscription and the Merchant Reference.
- “Merchant Ref” is a unique number which differentiates this subscription template from others.
- “Name” is an extended merchant ref - the name of the subscription template.
- Give a short description of the new subscription.
- “Description” is additional information; description of the stored subscription.
- Choose the Type of the subscription template (Manual or Automatic - without amounts).
- Choose the period type (limited or unlimited).
- Choose the period count.
- Define recurring price (please note that it cannot be “0”).
- Define setup price (it's a one-off fee which applies on the subscription start date, but you may choose not to set it up. You may leave this space blank if there is no set up price).
- Choose on update - this option enables you to choose what will happen with the subscriptions linked to this stored template, should you decide to amend/update the stored subscription (template) in the future. If you wish to continue with the active subscriptions as they are, not affected by the changes made to the stored subscription, select: “Continue subscriptions”. If you would like the active subscriptions to be updated automatically with any changes made to the stored subscription in the future, then select: “Update subscriptions”.
- Choose on delete - this option enables you to choose what will happen with the subscriptions linked to this stored template, should you decide to delete the stored subscription (template) in the future. If you wish to continue with the active subscriptions as they are, not affected by the changes made to the stored subscription, select “Continue subscriptions”. If you would like to stop all the active subscriptions which are linked to this stored subscription if it was deleted in the future, then select “Finish subscriptions”.
Once you make sure that all the details are correct, click on the “Create” button below. Then the template will be saved in the “Stored Subscriptions” list, and you will be able to use it to set up a subscription.
Subscriptions Registration
If you would like to set up a new subscription, go to “Subscriptions” in the drop-down menu.
All the previously registered subscriptions are listed in this section, and you can view their details. Depending on the subscription's status, you can find it by clicking on the specific status tab or to see all, click “All”.
Status Meaning
- Active - Subscription is still active and customer will be charged on next Payment Date.
- Suspended - Subscription is suspended for the moment and no charges will be taken from the customer.
- Completed - Subscription has been completed or the merchant has put it to completed early. The customer will not be charged and this subscription can still be searched by Merchant Reference.
- Deleted - Subscription is deleted, no charges to the customer. Can not be found by merchant Reference anymore. Can be searched in advanced filter.
- Cancelled - Subscription has been cancelled, no further charges to the customer. Cannot be searched by Merchant Reference. Can be searched in adnvanced filter.
In order to be able to create a new subscription, you need to select the option “Create Subscription”.

After that, fill in the details and make sure that you complete all the mandatory fields:
- Merchant Ref - You need to name your subscription with a unique reference.
- Stored Subscription - Choose a valid secure token to charge the subscription.
- Notification Language - To be used when sending the receipt notifications for the customer.
- Start Date and End Date - Limits to process the subscription.
- Recurring Amount - This amount can never be of “0” when editable.
- Setup Price - The amount can be 0, if required. Defines the unital charge of a subscription (i.e. admin fee, one off setup fee, etc).
An error message will appear if there are any incomplete details or incorrect details.
Once all the details have been entered, click on the “Create” button in the bottom right corner to save the subscription details. You can view the details of your new subscription in the list of all subscriptions. Click on the actions column and then “View” action.
Subscriptions Editing
If you would like to edit a previously create subscription, click on the “View” action link in the actions column. You will be presented with the edit page of that subscription.
A few of the fields won't be editable:
- In the Customer Data details tab you will be able to change the Secure Token, Notification Language and Recurring Amount.

In the Subscription Info details tab, you will be able to set a Period Limit (if not previously set), set a quantity of periods to be skipped, change the subscription's period limits and its status.
You can reactivate subscriptions, suspend active ones, complete them, or even cancel/delete).
Once you make sure that all the amended details are correct, and that you wish to save the new subscription with the changes, click on the “Save” button in the bottom right corner.
Subscriptions Deleting
If you would like to delete a previously saved subscription, just click on the “Delete” link in the Action column (“…”).
Subscriptions Exporting
If you would like to export the details of your subscription, click on the “Export as CSV” link on top of the search result table.

Subscriptions Payment History
If you would like to see the payment history of a specific subscription, click on the View Payment History link in the actions column.
After that you will be presented with another screen where you can see payments related to subscription that are still open (Open Transactions) or settled (Closed Transactions). If you click on the actions, you will be able to void/refund them or by clicking on the Order ID, you will be able to see the transaction details.

Subscriptions With Enhanced Data
Enhanced Data is a new feature which allows you to provide details on a payment to achieve lower fees for your transactions. To add enhanced data to your subscription payments, you use enhanced data templates (check Enhanced Data Templates) or add the data which should be used for details on payment in the subscription itself…
During registration

After registration, clicking on the subscription (or on “VIEW” action “…” option).
